Tips & tricks for migrating to Hugo
I migrated this site from Jekyll to Hugo over the course of a week during my between-jobs break!
There were a couple of issues with the previous version:
- It forked a Jekyll bootstrapper (jekyll-now) which felt like an unnecessary layer of abstraction.
- The theme I picked back in 2016 felt cluttered, and I wanted to make it simple & text focused.
- Comments were hosted on Disqus which I don’t use elsewhere.
This post goes over my experience with the migration as well as what I wish I had known before starting the process.
Understanding Hugo concepts
Although it was easy to go from 0 to 1 with the hugo server command, I found the Hugo documentation unintuitive to navigate. When I’m starting out with a new tool, I first look for a broad overview of critical features. Instead, Hugo’s documentation is organized into dozens of sections where each one has its own Introduction page to click through.
If I were to start over again, I would read Agustin Canalis’s excellent Hugo overview post as well as this Hugo templates guide by Régis Philibert first to go beyond the “Quick start” doc quickly.
Design
From the start I knew I wanted to go with the Hugo bear blog theme, so the design was more a matter of customizing the color palette to my liking. After rolling the dice with colors.co a bunch of times, I was satisfied with this green / orange based palette. Once I got a passing grade on whocanuse.com and checked its accessibility, the next focus was on specific CSS issues.
Code blocks
Besides the minor issues (e.g. inline code highlight, iOS safari text scaling, etc), the biggest challenge for me was handling the code overflow. When the line went beyond the initial width of the code block, it lacked a background style.
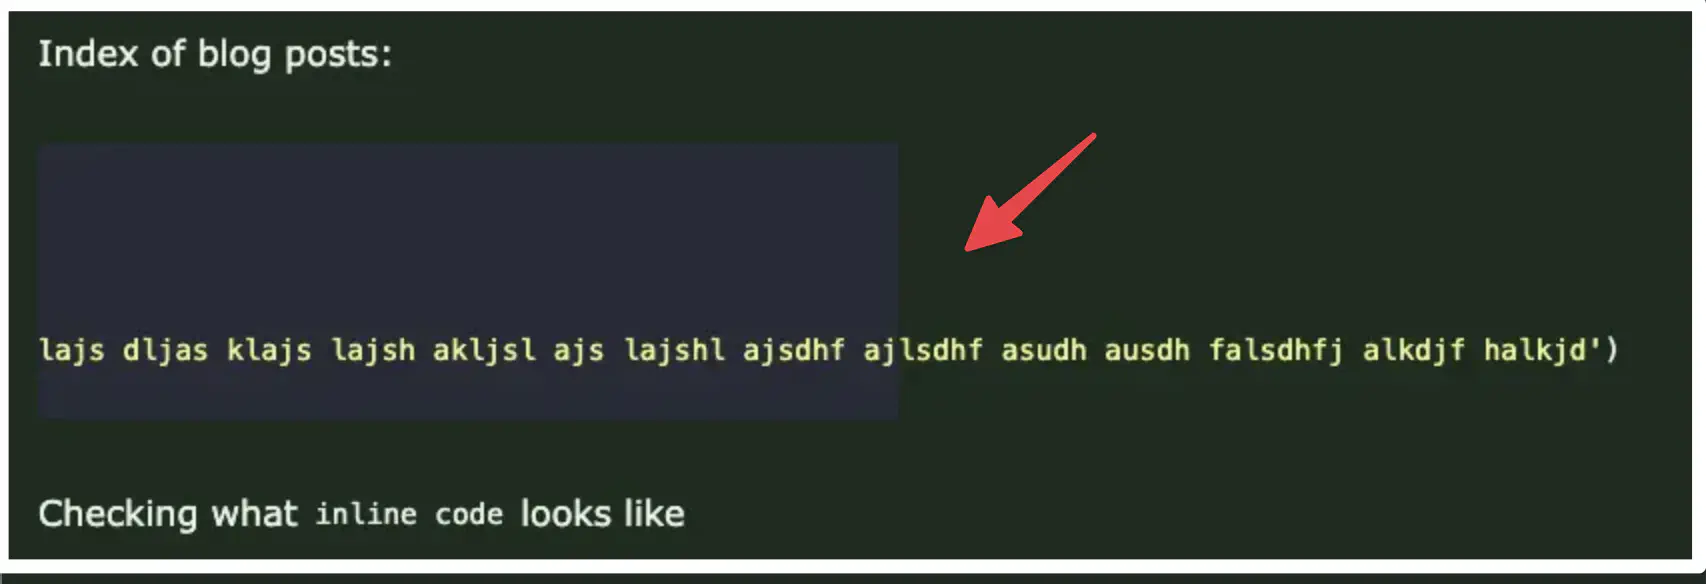
Thankfully Veriphor’s “Code block line numbers” post explained how it’s rendered and the solution provided worked for me.
.highlight pre code {
    display: inline-block;
}

.highlight div,
.highlight > pre {
    overflow-x: auto;
}
For these code blocks, Hugo uses the Chroma syntax highlighter under the hood. Despite having many available themes, not all of them are created equal. In particular, the github-dark theme incorrectly highlighted code so I went with dracula instead which was more accurate.
RSS feed
The previous version relied on Jekyll’s default RSS feed generator, but I wanted to get a better understanding of the protocol. I first read these two posts to get an overview of how it’s set up in Hugo:
- Joseph D Heyburn: “Who Goes Blogging 6: Three Steps to Improve Hugo’s RSS Feeds”
- Ben Congdon: “Tips for Customizing Hugo RSS Feeds”
The important pattern to recognize here is that the RSS feed can be overwritten with a new layouts/_default/rss.xml file. The order of RSS feed processing is your own in layouts/_default > theme default > hugo default.
I was pleasantly surprised to find that the RSS 2.0 spec is short & straightforward to read. In the end, I made my own xml file which tweaked the title & description from the theme’s xml file.
Image optimization
In my first attempt, I placed all the images under the static/images directory. It turns out that placing them under assets/images instead makes them available for Hugo’s image processing capabilities. At this point, the easiest way is to use Hugo shortcode to refer to them in the Markdown file. However, I preferred using the markdown native  syntax.
One way to get around this is to use Render Hooks. For example, when Hugo processes the following markdown file:
# Hello World


Hugo recognizes that the file requires rendering one Heading and two Image components. For each of these types, Hugo checks the layouts/_default/_markup directory for user-created render hooks. In my case, I created the following in layouts/_default/_markup/render-image.html (note that the file name needs to match exactly as expected in the doc):
{{- /* Use the render hook to make asset images available in posts */ -}}
{{- $image := resources.Get .Destination -}}
{{- if $image -}}
  {{- if strings.HasSuffix $image ".gif" -}}
    <img src="{{ $image.RelPermalink }}" alt="{{ .Text }}"{{- with .Title }} title="{{ . }}"{{ end }} loading="lazy" />
  {{- else -}}
    {{- $optimized := $image.Process "webp q75 lanczos" -}}
    <img src="{{ $optimized.RelPermalink }}" alt="{{ .Text }}"{{- with .Title }} title="{{ . }}"{{ end }} loading="lazy" decoding="async" />
  {{- end -}}
{{- end -}}
The top level dot . in this case refers to the Render Hook Image context which includes the Destination method for the image path in assets/. resources.Get returns the image resource context. It then calls the Process method to request the optimized version of an image ("webp q75 lanczos"). This render hook is called for each Image component discovered during the markdown rendering process. In the example Markdown text, it would be called twice to generate the following HTML:
<h1>Hello World</h1>

<img src="/images/earth.webp" alt="earth" loading="lazy" decoding="async" />
<img src="/images/sun.webp" alt="sun" loading="lazy" decoding="async" />
Michael Welford’s “Responsive image management with Hugo” goes much beyond my basic implementation if you want to expand on it.
Using the simple image processing allowed one of my image-heavy posts to reduce total image size from 673 KB to 176 KB, which is a 73% reduction!
Comment system
Darek Kay wrote a great post on the current static site comment ecosystem. I initially wanted to implement a Bluesky commenting system (like in Kaushik Gopal’s post), but realized that my readers would mostly be technical folks who already have a GitHub account. Hence, using Giscus which is based on GitHub Discussions seemed like a lower barrier to entry. Giscus set up took from start to end maybe 10 minutes.
I recommend reading Bryce Wray’s “Tips for using giscus” post. The point about creating a separate repo just for comment discussions was something I would have overlooked otherwise.
Deployment
This site is hosted on GitHub Pages & deployed with GitHub Actions. I copied & pasted the YAML from the deployment documentation and it surprisingly worked right away. The only hiccup was the extra commits to the theme git submodule I made which CI couldn’t pull from, so I manually moved the theme under the themes directory instead & removed the git submodule.
The domain’s DNS nameserver is set to Cloudflare for basic DDoS protection, TLS, bot filtering, and CDN caching. I moved from Google Analytics to a more privacy-focused Simple Analytics to avoid setting up the cookie banner.
Summary
Although it was certainly a bumpy ride, I’m still content with the decision to go with Hugo. It had all the features I needed and the CLI was as fast as people praised it to be. I also unexpectedly found that Hugo users seem eager to share setup blockers they encountered on their blogs! This post is my way of paying it forward.
Let me know if any of the tips were useful in the comments!